You know what is one of hubby and my most favourite thing to do over the weekends? You guessed it – making delicious food!
But it’s not just the fact that we make nice food that we enjoy; more importantly, it is making food that brings back memories of wonderful places we’ve visited, special memories we shared when we first had it… and then, getting to share a piece of that with our nearest and dearest, or even just for the two of us. I think what it really boils down to is that we actually love to make food with meaning.
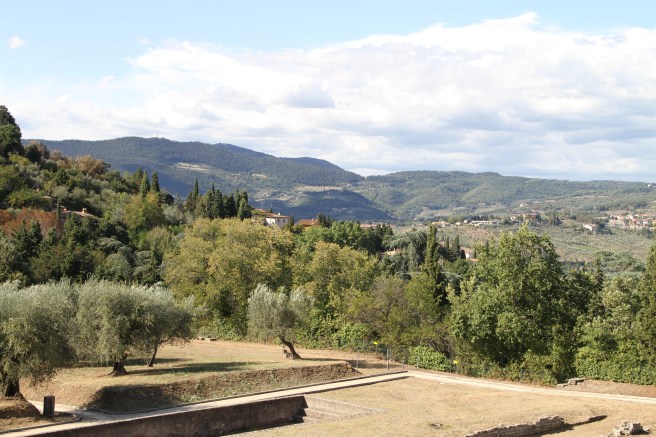
However, we don’t always want to spend hours in the kitchen; especially if there is beautiful summer days to enjoy outside on the patio. And beautiful summer days inevitably remind me of Italy and that real ‘outdoorsy’ lifestyle that we fell in love with. And if I think of Italy I think of focaccia, cold meat, cheeses… and balmy days where lunch has to be enjoyed outside in the shade.
Beautiful Tuscany – balmy summer days, worthy of spending your time outdoors
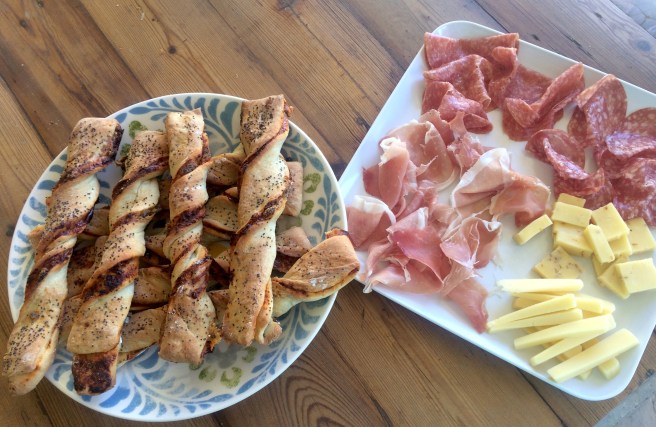
So these chunky breadsticks really reminded me of our time in Italy. What’s great about it is that you don’t have to spend much time in the kitchen! Sure, it takes a little longer to make as the dough needs to prove, but that just gives you time to spend outside, sipping on a glass of wine! These ones are made with sundried tomatoes anchovies, but you can really add anything you like; think of olive tapenade with a sprinkling of rosemary, or even red pepper pesto with herbs and feta.
Sundried tomato and anchovy breadsticks
(makes about 24 breadsticks)
Ingredients:
Making the bread
4 cups whitebread flour
2 teaspoons salt
10g instant yeast
4 teaspoons sugar
1 ½ cups lukewarm water
1 tablespoon olive oil
For the filling
4 tablespoons anchovies, roughly chopped
1 cup sundried tomato pesto
1 tablespoon fresh rosemary, chopped
1 cup grated Grana Padano
A few grindings of black pepper
Poppy seeds, to garnish (optional)
Method:
Preheat the oven to 200°C.
In a bowl, add the flour, salt, instant yeast and sugar. Mix well and then add the lukewarm water little by little. Turn the mixture onto a floured surface and knead until you have a smooth dough. Once you’ve reached this stage, add the tablespoon of olive oil, and knead that into the dough.
Place the dough into a large bowl. Sprinkle a little bit of oil the top to stop the dough from sticking and cover the bowl with cling film. Place the dough in a warm place and leave to prove until it has doubled in size.
Turn out the dough onto a lightly floured surface. Roll it out with a rolling pin unitl thin and even.
Spread the sundried tomato pesto over the dough then sprinkle anchovies, the rosemary, the Grana Padano cheese and grind over some black pepper to taste. (Be sure to spread to the edges.)
Fold the dough in half and form a rectangle.
Cut off the edges where there is no filling, and then cut the dough into one 2.5 cm strips. Give them a slight twist. (You are looking for a loose corkscrew effect.)
Place your breadsticks on a lightly floured baking tray (keep them slightly apart to leave enough room for them to rise). Brush them with water and then sprinkle over some poppy seeds.
Leave them to rise until they are twice their size.
Bake for 15 to 20 minutes until golden and crisp.
It is lovely when you serve it shortly after baking – just leave it to cool long enough so that it won’t burn your mouth! We had ours with some lovely Italian cold meats and cheese. And the wine of course!
For us, Sundays are typically lazy days – having a little lie-in, then getting up and enjoying a cup of coffee on the patio and finally contemplating what we would like to do for the day.
In the summer that mostly involves pottering around the garden, taking a dip and in the pool and then going out for a lunch at one of the many beautiful wine farms that surround Somerset West and Stellenbosch – so lucky to live here in the Cape Winelands!
However, in the winter it is a different story (apart from the lie-in, of course). Winter times we have coffee in bed (or otherwise dressed like an Eskimo on the couch, under a blanket) and it inevitably involves some type of comfort food for lunch! But, when the sun is out – like today – our lunchtime plans turns into a hunt for how we can maximize the sun spots around the garden.
So instead of being indoors today, you will find us sitting on the patio, in the sun, having a little grill while watching Formula 1! (Yip, I’m a huge fan. Funny story – in high school I really liked a boy who really liked Formula 1. So, in order to make the requisite impression I immediately started watching the races… And while the crush didn’t last, my love for Formula 1 never went away!)
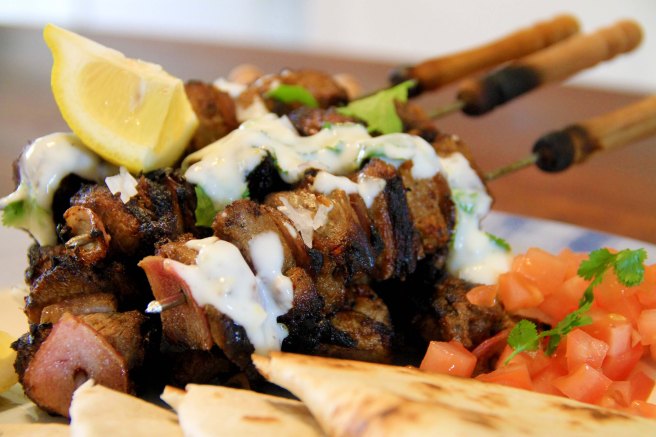
On the menu today is a firm favourite of hubby and mine – Moroccan lamb kebabs with flatbreads. What I really like about this dish (apart from its wonderfully aromatic Moroccan flavours) is that is really great to serve if you have a few friends over. You can prepare everything beforehand and then just sit and enjoy your time with them around the grill. I also like that we keep the dishing up interactive – we lay all the components of the dish out on the table – and then everyone can help themselves and put their flatbreads together with the combinations that they prefer. Some want a bit more chili, others a bit more yogurt… Really sociable!
Lastly, I have to confess – depending on how the mood takes me, I might take the time to make my own flatbreads and on other days (like today!) I will just buy them. I could not be bothered to spend any more time indoors than what I absolutely need to today! However, if you are feeling up to it, I’ve included my very easy flatbread recipe below.
Moroccan lamb kebabs with flatbread
(serves 2)
Ingredients:
For the lamb kebabs:
400g lamb, cut in cubes
1 red onion, cut in pieces
For the marinade:
Juice of 1 lemon
2 tablespoons olive oil
1/2 cm ginger, freshly grated
1 garlic clove, crushed
1 pinch cumin
2 pinches dried chili flakes
For the yogurt sauce:
1 garlic clove, crushed
1 bunch coriander, roughly chopped
250g plain, natural yogurt
1 tablespoon lemon zest
Salt & white pepper to taste
To serve:
2 tomatoes, chopped
1 lemon, cut into quarters
Handful of coriander
4 flatbreads
(Tip: If using wooden skewers to make your kebabs, soak them in water for 10 minutes to prevent them from burning.)
Method:
Mix all the marinade ingredients in a bowl.
Add the lamb cubes to the marinade and mix well, ensuring the meat is nicely coated.
Next, thread the meat on to the wooden skewers – alternating a cube of lamb and a slice of red onion.
For the yogurt sauce, mix all ingredients in a bowl and place in the fridge.
Heat the grill until it is nice and hot. Grill the skewers on all sides for about 7 minutes (depending on the size of your lamb cubes).
Heat your flatbreads in a pan.
To serve, take the meat off the skewers and place in a large serving dish.
Add your lemon and the flatbreads
Serve with the chopped tomato, coriander and yogurt sauce
Fill your own flatbread and enjoy!
Easy flatbread
Ingredients:
115g white flour
25g wholemeal flour
pinch of salt
Method:
Sift the flour and salt into a bowl.
Make a well in the middle of the flour and gradually add 100 ml of lukewarm water to the middle, adding flour in from the sides.
Knead the dough until it is firm and springy – add a bit more water/flour if needed to get the right consistency.
Divide your dough into small round balls (you should get about 10/12 out).
Place on a floured tray and cover with a damp cloth. Leave for 45 minutes.
Once ready to cook, roll each ball of dough into a thin, wide circle.
Dust them with flour and keep them covered with a damp cloth to prevent them from drying out.
Heat up a flat pan and place your flatbread in the dry pan. Turn them over to the other side when they begin to go brown and bubble.
Once done, I keep them in a plate with a damp cloth to prevent them from going too crispy.
PS: So at the time of writing this on Sunday morning, we were filled with joy at the prospect of a beautiful sunny day. Mother Nature had other plans – the sun never made an appearance! So this dish was prepared on a griddle pan on the stove, and enjoyed in front of the fireplace!
Beautiful Narbonne, where I had my first ever steak tartare
I was still small when I discovered that I did not mind rare (raw!) meat. I remember when my mom used to buy our meat from the butcher at month-end… A Friday afternoon would be spent packing the meat, sausages and ground beef into portions and packing it into the freezer. I always tried to sneak a pinch of the ground beef. I loved the taste of it, but always felt very naughty doing so. My folks would not ever consider having a steak that was not super well done, so what demented child was I, eating raw meat like that?! As I got older, much to my relief I came to realise that some people did actually prefer their steaks cooked medium or even medium rare and when I saw beef carpaccio on a menu for the first time I knew that I was fine!
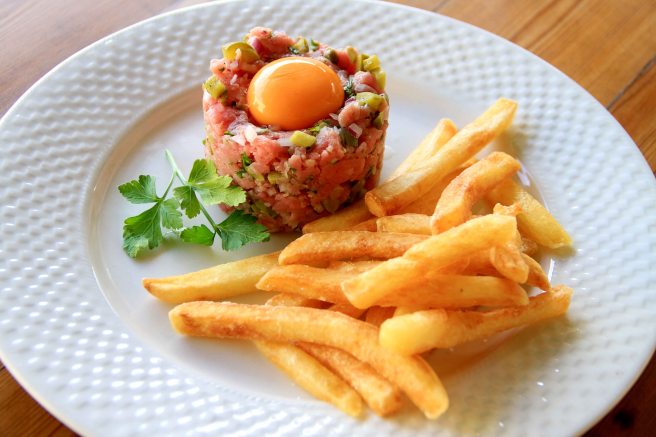
The first time I heard of steak tartare was on my favourite cooking/travel show of all time – Rick Stein’s French Odyssey. According to him it was a very fashionable dish in France in the sixties and it seemed to have made a comeback in recent years. In the program he told a story of how, when he’d order it, French waiters would always pull up their noses at him and say indignantly “You know that it is raw, sir!”. He was delighted by the fact that an Englishman could prove them wrong and eat it without even batting an eyelid. On the show, when he made it, I was sure that I would love it and therefore when we visited France last year I made sure that I searched it out on the menus! We found it in a little brasserie in the south west of France in a small city by the name of Narbonne and it was everything I hoped it would be – the meat full of flavour, blended beautifully with the addition of the tangy capers and gherkins, and the egg yolk giving a velvety feel to it all.
So when Frexit hit me last week, I thought back to this must-have dish and hubby and I decided to give it a try and make it ourselves, using Rick Stein’s recipe. I was so chuffed! It turned out beautifully and tasted exactly like the dish we had. (What was different though, is that the restaurant where I had it, served the rest of the ingredients separately from the meat – so that you could add your own quantity of ‘toppings’ to each little bite of beautiful beef. I must be honest, I actually prefer the way we made it in the recipe below – all mixed together.)
If you are not an adventurous eater this will not be a dish that appeals to you. But if you wonder about it – try it! You will not be disappointed! (You can also start slowly – take that pinch of ground beef sometime!)
Steak tartare with pommes frites
(serves 2)
Ingredients:
300g tail end of beef fillet, straight from the fridge
1 tablespoon capers, finely chopped
2 shallots, fine chopped
2 tablespoons chopped flat-leaf parsley
1 tablespoon olive oil
1 gherkin, finely chopped
½ teaspoon sea salt flakes
10 grinds of black pepper
2 medium egg yolks
(Rick Stein added 3 dashes of tabasco sauce to his dish, be we did not. We served it with tabasco on the side.)
Method:
Trim the meat of all fat and sinew and chop finely by hand.
Put the meat into a bowl with the capers, shallots, parsley, oil, gherkin, salt and pepper.
Mix together lightly two forks and then spoon into the centre of two plates and shape into a neatish round. (We used little round metal moulds to get a nice shape to ours.)
Make a small indent in the top and then gently add an egg yolk to each.
Serve with some pommes frites (good old French fries, if you are not trying to sound fancy!)
Sundays have never been a particular favourite day of mine. I think it stems from when I was small. After Sunday lunch my thoughts always turn to the inevitability of Monday morning and back to school; and when at seven pm the theme song to my parents’ favourite wildlife program would ring out on the telly, I knew with certainty – the weekend was over.
I’ve carried a bit of that into my adult life and I will lie if I say that the same case of Sunday blues don’t still affect me some days. However, being grown-up has other perks (apart from no homework!) which makes Sundays a whole lot more bearable. There’s the Sunday morning lie in, coffee in bed, sometimes a late brunch (with some bubbles of course!)… or like today, the anticipation of a wonderfully lazy lunch at home, trying out a new recipe I found in a magazine.
There is something about making slow food, without a rush, that is good for the soul. I think it might be because it helps you to focus in the present; be it getting your hands a bit dirty, the aromatic smells, practicing your chopping skills or sipping a glass of your favourite wine – there is no worries beyond creating a wonderful meal and definitely no thoughts of Monday looming!
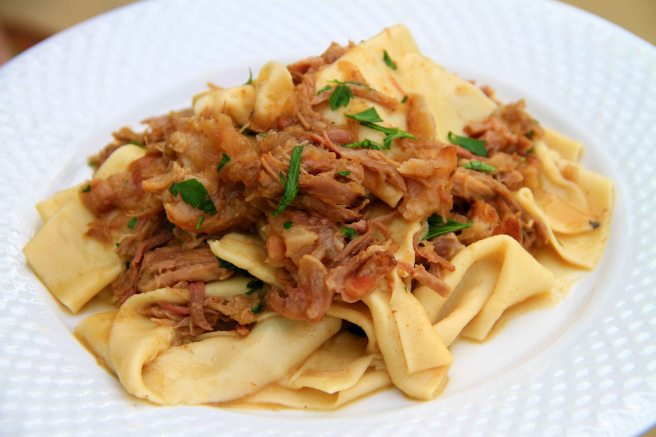
So today this lunch of homemade pappardelle pasta and pulled pork is just the thing to make the weekend last that little bit longer. And if I am lucky there might be some leftovers for … let’s rather not say it!
Homemade pappardelle with pulled pork
(serves 4)
Ingredients:
For the pork:
2 tablespoons olive oil
1 garlic clove, chopped finely
2 tablespoons of apricot jam
1 kilogram pork shoulder
1 onion, finely chopped
3 apples, peeled, cored and cut in quarters
2 pears, peeled, cored and cut in quarters
250ml vegetable stock
250ml cider
For the pasta:
400g flour
Salt
4 eggs
2 tablespoons of butter, melted
Handful of chopped flat leaf parsley, chopped
Method:
Pork:
Preheat your oven to 180 degrees Celsius
Rub the pork with the apricot jam and garlic.
Heat the olive oil in a large pan and brown pork on all sides. Remove the pork from the pan, place in an ovenproof dish and set aside.
Add the chopped onions, apples and pears to the pan and fry until caramelized.
Place the onions, apples and pears with the pork in the ovenproof dish and add the stock and the cider.
Cover with a lid (or foil) and roast in the oven for 1.5 hours or until the meat can be pulled apart easily.
Shred the meat in the dish.
Brown pork on both sides
Fry apples, pears and onions until caramalized
Add the apples, pears and onions to the pork shoulder and pour over the cider and vegetable stock
Pasta:
Place the flour into a large mixing bowl.
Add a pinch of salt and make a well in the centre of the flour.
Add the eggs to the centre of the well and mix until a dough forms.
Turn the dough out on a lightly floured surface and knead it until elastic. Cover in clingfilm and lest it rest for 30 minutes.
Flatten the pasta dough out with your rolling pin and then roll it out to about 3mm thick. (You can use a pasta machine if you don’t have the arms for it!)
Cut it into about 5cm wide strips and cook in boiling salted water until al dente. Drain off the water.
Make a well in the middle of the flour and add the eggs
After resting the dough, roll out in 3mm strips
Cut the pasta to pappardelle
Cut the pasta to pappardelle
To serve, toss the hot pappardelle with the melted butter. Add the pulled pork and gently mix through. Top off with the chopped parsley.
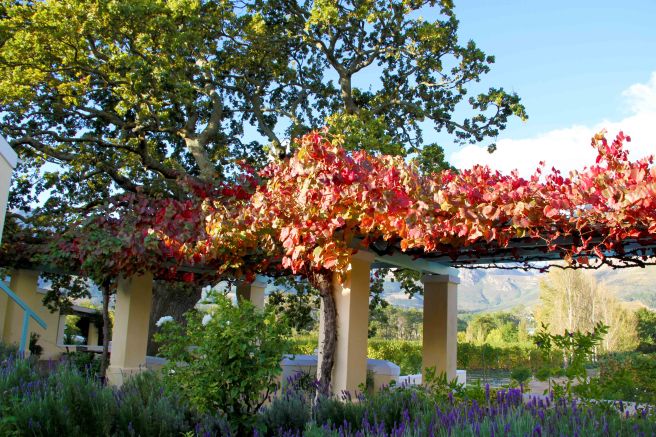
The beautiful colours of autumn in Franschhoek, close to Cape Town
Autumn is my favourite season. Ok, so getting up in the mornings for work while it is dark is not the greatest – nor is getting home and it being dark again – but it still does not take away from the things I love about this time of the year:
The sun rising over the mountains while I travel to work (no matter how bad the traffic, it brings a smile to my face)
The beautiful orange, yellow, red and brown leaves on the trees
Lighting the fireplace for the first time since the previous winter
Snuggling under a blanket on the couch watching my favourite sports (rugby, the Tour de France and F1)
But the best of all… gorgeous blue sky days that are not too hot or too cold so that a person can just laze about outside while soaking up a bit of sun and breathing in the crisp autumn air
And even better, we are always lucky that the best of those days are seemingly reserved for a Saturday or Sunday, which means that I have the pleasure of enjoying it for myself, instead of just staring at it longingly through the window by my desk!
Days like this won’t be complete without a perfect little lunch to go with it (and some bubbly of course!) And is there a better way to celebrate the outdoors than by having a braai (or a barbeque for those not from SA)?! So looking at the weather for the weekend it seems like we are in for another stunner of a day on Sunday. And while I don’t know what will find its way on to the lunch table this time, I still have fond memories of what hubby made last Sunday – inspired by a South African chef, Ruben Riffel. Let’s just say a fire was lit, a braai was made and a good time was had by all! Yum!
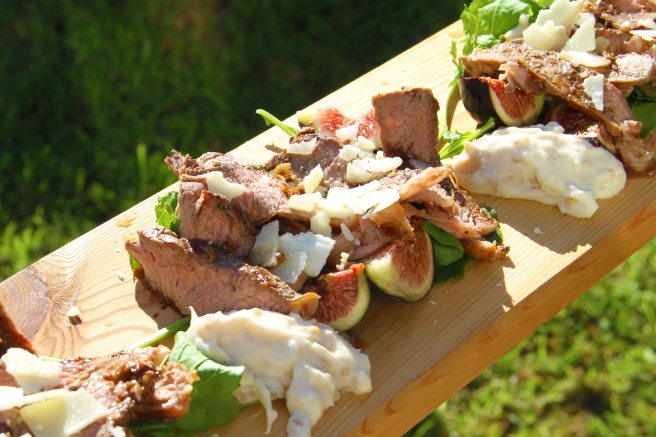
So if you are looking for something light and delicious to enjoy this weekend, how about giving this salad a try? Whether you make it on a braai, use your barbeque or a grill, get out there and enjoy!
Seared steak with horseradish, fig and rocket salad
(serves 2)
For the meat:
300g sirloin steak
Freshly ground salt and black pepper to taste
For the salad and vinaigrette:
Big handful of rocket leaves
4 ripe figs
12 caper berries
½ cup parmesan cheese shavings
2 tablespoons of olive oil
1 tablespoon balsamic vinegar
2 garlic cloves, finely chopped
1 lemon
For the horseradish cream:
2 tablespoons creamed horseradish
2 tablespoons mayonnaise
1/2 teaspoon of sugar
Method:
To make the horseradish cream, mix all the ingredients well and set to the side.
Remove the meat from the fridge at least 20 minutes before putting in on the braai/barbeque. Season with freshly ground salt and black pepper.
Place the meat on the braai/barbeque and cook over a high heat on both sides until seared on the outside. Best served medium, which should take about 8 minutes on each side. Remove from the heat, wrap in foil and rest for 5 minutes.
Mix the olive oil, balsamic vinegar and garlic together
Slice the figs and capers
Place the rocket at the bottom of your serving dish.
Slice the meat in thin slices and arrange on top of the rocket.
Scatter the figs, capers and parmesan shavings over the top.
Drizzle with the vinaigrette.
Squeeze over some lemon juice and serve with dollops of the horseradish.
If you have any recipe ideas that I could try on these beautiful autumn days, feel free to comment and let me know!
I will never forget the first time I ever laid my eyes on the Mediterranean. We arrived in Rome after a 21 hour flight from Cape Town. Exhausted we had to rush to catch a train from Rome to Naples. Two hours later (and no chance of sleep; I was petrified of missing our stop!) we arrived in Naples and had to rush to make the next train; a commuter train called Circumvesuviana that runs to Sorrento. That was a horrid journey – “commuter train” translated means that there are no seats (well, at least not in the coaches we were in) and we had to stand the whole way to Sorrento. I was so tired and exhausted that I could hardly stand on my feet and hubby had to give a lot of moral support to stop me from bursting into tears from sheer exhaustion. Arriving in Sorrento, waiting at the station for the SETA bus that would finally take us to our destination, Praiano, I caught I small glimpse of some blue water between a row of houses. So to be fair, that was probably the first glimpse of the Mediterranean. But then, as we finally got on the bus and started the last leg of our journey, the blue jewel revealed herself to us and in that instant we fell under her spell.
The first picture we took of the beautiful Mediterranean – from the SETA bus!
The famous Amalfi Coast drive was everything the books tell you it is – twisty, turny, breathtakingly beautiful and quite the adrenalin rush. The speed with which the bus drivers navigate the narrow road is something to experience. At first I did not understand why the driver was hooting randomly; was he just greeting people or were people upsetting him on the road? After paying a bit of attention I figured it out; he hooted every time we approached a bend so that if there were cars approaching from the other side, they would hear the bus coming. That way they would know to stop or get out of his way! Ingenious! And testament to the fact that they slow down for nothing!
Views of the Amalfi Coast drive from the bus!
Views of the Amalfi Coast drive from the bus!
Views of the Amalfi Coast drive from the bus!
Impossible to believe how the lemon groves cling to the side of the cliffs!
Views of the Amalfi Coast drive from the bus!
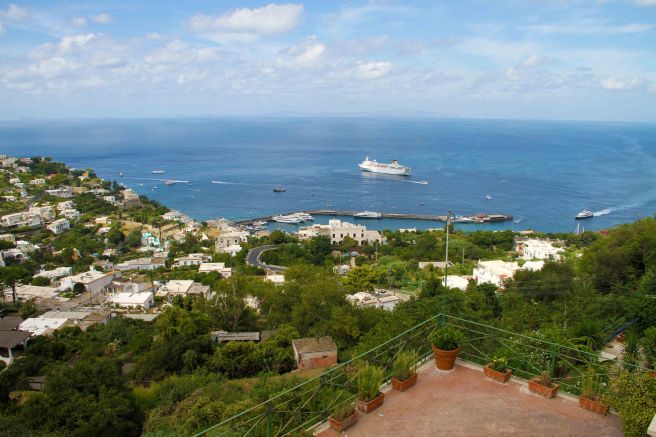
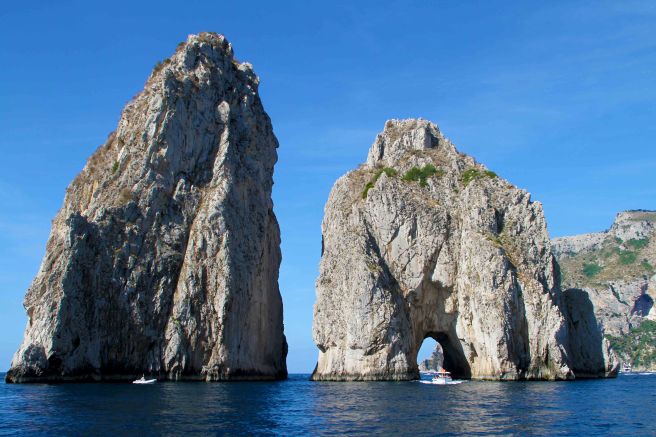
So just about 24 hours after we left Cape Town we finally arrived in Praiano. Exhausted, but in love! I have previously written about my love for Praiano and its little beach La Praia. This is undoubtedly where our love for the Mediterranean comes from. I know what made this extra special for hubby was a trip that we took from Praiano to Capri. A local tour operator offered day trips to Capri and eagerly we signed up, wanting to see Capri but also the beautiful Amalfi Coast from the water. The journey by speedboat was amazing. Half way to Capri, in the middle of the ocean, our skipper stopped the boat. In his best English and with some hand gestures he indicated: “Now you swimming!” Hubby loved it! They had snorkeling equipment on the boat and he said it was the experience of a lifetime. The water was crystal clear; you could see down into the water for meters and meters and the fish….according to him it was like seeing a world that you never knew existed; swimming alongside fish that you have never seen before. With the water being so salty you did not really have to do a lot of swimming and floating was easy. To this day this is really one of his biggest highlights of any holiday. Me, being a novice swimmer, I didn’t have the courage to jump into the ocean; if my toes can’t touch the ground I get panicky!
View from the boat.Amalfi Coast from the water…The view from the top of Capri!Fraglioni rocks, off Capri
And maybe that is part of the allure of the Mediterranean for me. The gentle waves. And the swishing sound it makes. The sea along our coast is much different, with waves thundering down. I’ve never known what “gentle waves lapping the shore” meant until I experienced the Mediterranean. And the best part of that is that it gives someone like me that is a bit scared of the big, rough seas the opportunity to swim in the ocean. Oh, and how I love it. The water is so quiet and clear that even I feel comfortable splashing about; even swimming a bit… provided that my toes can touch the bottom! Some of the best times on our holidays have been when we were laying next to the sea, listening to the hypnotic sound of the waves. Very few things come close.
Laia Praia harbour and beach
La Praia Beach
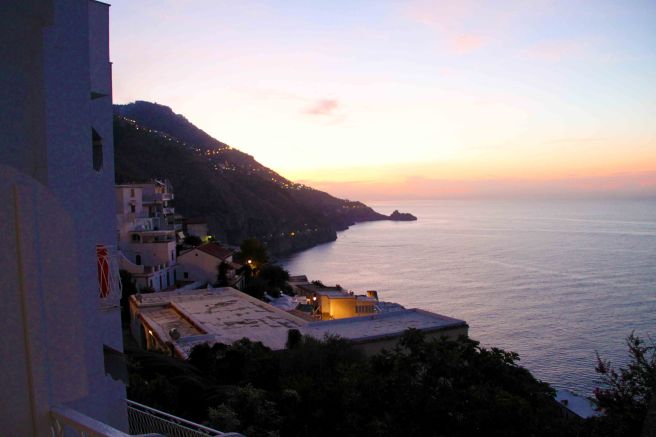
Sunset on our last night in Praiano
But in talking about the first place where we’ve seen this beautiful blue ocean, my mind instinctively wanders to the place we last basked on her shores.
It was last year September (way too long ago, if you ask me!) and on the last day of our holiday on the Côte d’Azur we took the train to Menton. What drew us there were all the good things we read about its stunning beaches and with Menton also being just about the last stop on the French Riviera before you head into Italy it made me think that I might be able to have a pretty decent pizza while we were there! (It was uncanny to see road signs, showing Italy was just 10 miles away!)
The beautiful Menton beach
When we arrived at the train station we immediately set off for the beach. It was not hard to find; we just followed a group of locals who were carrying beach chairs and umbrellas! And when we got there, we knew that we picked the perfect place to end off our holiday. The water was warm, calm and clear; I could swim and for a moment I forgot that my toes needed to touch the bottom because for once there was a view that could compete with the beauty of the Mediterranean – Menton’s old city cascading down the hill.
The Mediterranean and the old town of Menton. Bliss.
Laying on the beach was surreal. Just closing my eyes, feeling the sun on my skin and listening to the ocean. Staring out in front of me into the big blue and when I turned my head sideways, this stunning old city (and hubby) to my right. It was a perfect day! For lunch we didn’t have to go far; there was an amazing restaurant close to where we were. Hubby had an amazing seafood platter; he says the best he has ever had and me? Well, I had my pizza!
Hubby enjoying the water!
Perfection!
Me, doing some r&r!
View from the restaurant in Menton.
According to Hubby: “The best seafood platter ever!”
I love pizza!
So if you crave a taste of the Mediterranean, I suggest you play this video on repeat, while preparing a bit of fish.
Cheers, until my feet touch your shores again!
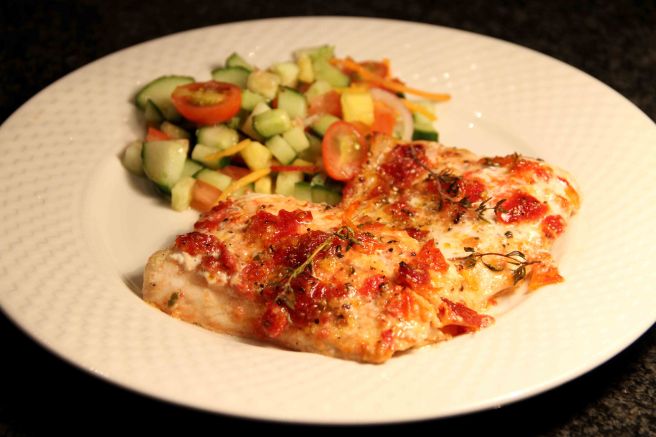
Kingklip with sundried tomato marinade
(serves 4)
Ingredients:
4 kingklip fillets (or any firm fish that you can source locally)
Juice of half a lemon
60ml olive oil
3 tablespoons of sundried tomatoes, chopped
1 teaspoon of sugar
1 clove of garlic, crushed
4 sprigs of fresh thyme, chopped finely
Salt and freshly ground black pepper to taste
Method:
Preheat your oven to 180 degrees
Mix lemon juice, olive oil, sundried tomatoes, sugar, garlic, thyme, salt and pepper together
Pour over fish and marinade for 30 minutes
Transfer the fish to a baking tray and place in the oven for 15 minutes until the fish turns opaque and flakes easily when prodded with a fork
Last year the holiday I have been dreaming about for so many years finally came to be. We hired a boat and went cruising down the Canal du Midi in the south of France. From there we went on to experience the picturesque Provence before finally ending our trip on the beautiful Côte d’Azur. It took careful planning… how to make the most of our limited time and to stay within budget!
One place that I really wanted to include in our schedule was Narbonne. Rick Stein briefly visited its fresh produce market (one of the largest in southern France), in Rick Stein’s French Odyssey (the tv show that was really the starting point of our aspirations to cruise the canals of southern France) and because it is not a big city it seemed like it would be a great stop to catch our breath before we embarked on our trip to Provence.
Apart from the market we didn’t know much about it, so I must be honest in saying that we had no real expectations; apart from buying some great produce at the market that we could make back in the self-catering apartment we rented!
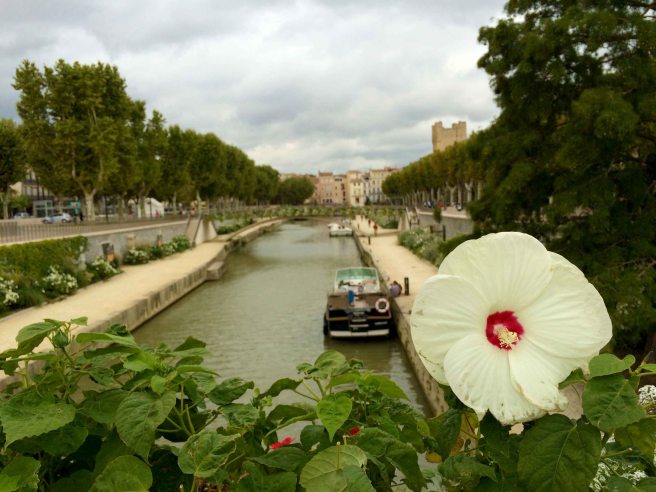
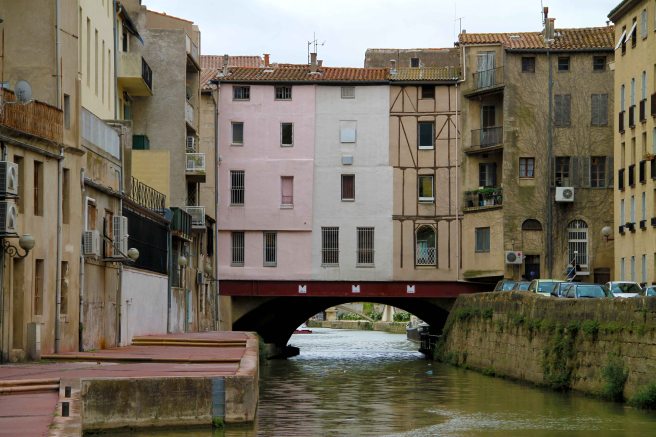
We arrived by train and because we only stayed two nights we set off to explore the medieval center of town straightaway. I was immediately taken with how picturesque it was. I loved the streetlights in the streets surrounding our apartment and the buildings were so beautiful. The Canal de la Robine goes through the middle of town and each bridge that crosses the canal was covered in beautiful flower baskets. I just loved the feel of the Narbonne. It felt authentically French; it was without pretense, without masses of tourists and without trying to be anything that it was not.
We found our way to the tourist office, which was not far from the Pont des Marchands, or Merchant bridge, which basically is the foundation for a row of houses and shops. (It actually reminded me of a miniature version of the Ponte Vecchio.)
Armed with a map in hand, we were amazed at all that Narbonne had to offer. It might be a small city but it had so many hidden treasures. It is hard to pick just a few (and we definitely did not get to see all that we would have liked to) but here are our favourites:
Cathedrale de St-Just and St-Pasteur
Building on the cathedral started in 1272. If you climb the adjacent Donjon Gilles Aycelin you can really marvel at the architectural beauty.
The Roman Horreum
This was a fantastic experience and a must do if you visit Narbonne. It was a Roman underground warehouse and dates back to the end of the first century BC. It has been set up with a wonderful display of light and sound… goosebump stuff!
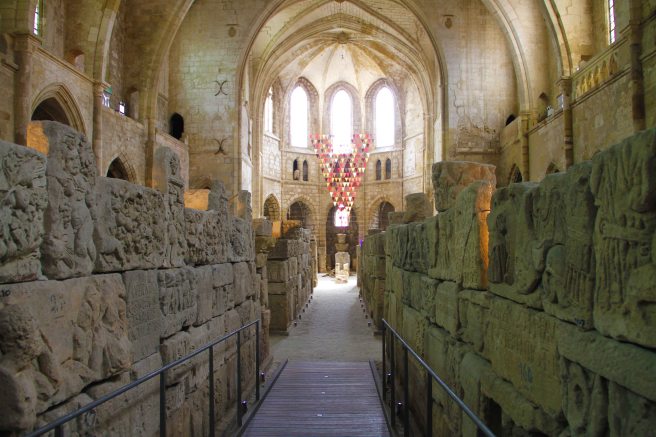
Musee Lapidaire
This is another must do. Inside the old church of Notre Dame de La Lamourguier about 1 300 blocks of stone from all kinds of Roman buildings are housed. We paid for our entrance tickets and when the door opened I literally gasped for air – the setting is that beautiful. (The lady selling the tickets was bursting with pride; the biggest smile on her face!)
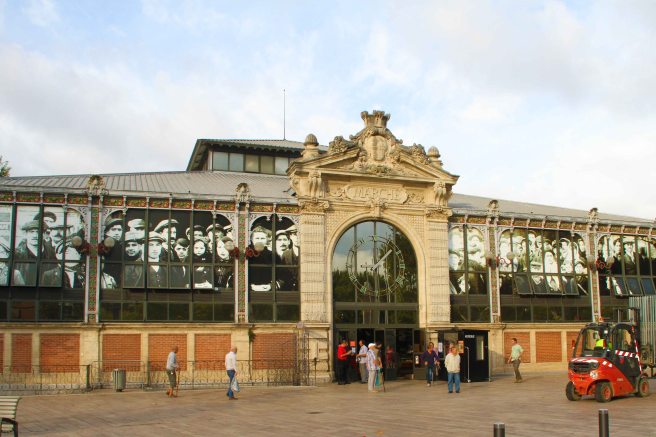
For the culinary part of our visit we spent quality time in Les Halles de Narbonne. We arrived early morning and drank coffee with the locals at one of the coffee bars inside. And then we went on the hunt for what we came for… sardines! Rick Stein made sardines on the barbeque when he was there and although we would not have the luxury of that, we hoped to pick up a few that we could fry with some butter, garlic, lemon and parsley back in our little apartment. Oh, and we were not disappointed. Apart from all the wonderful seafood on offer, the market was brimming with everything your heart can desire. One can easily stay in Narbonne a month and would still not be able to eat your way through the market!
Our supper that night consisted out of a starter of fried sardines and a main of fresh pasta with clams, tomatoes and parsley, while we sipped wine from the region.
So Monday was a public holiday in South Africa and hubby and I had some gardening to do… more specifically, it was time to harvest our olives! After such hard labour we sat back with a glass of chilled dry rosé and barbequed a few sardines. Although this can hardly be called a recipe – because it really just relies on the wonderful flavour of the fish and the smokiness of the barbeque – here is our take on sardines on the barbeque. We enjoyed it with our fond memories of Narbonne.
Sardines on the barbeque
(serves 2)
Ingredients:
6 sardines, gutted and cleaned
3 tablespoons of olive oil
Juice of half a lemon
Handful of roughly chopped parsley
Coarse sea salt flakes
Method:
Light barbeque and wait for the coals to get hot
Rub the fish with olive oil and sprinkle with lemon juice and salt
Place the fish on the barbeque once the coals are really hot and grill for 6 minutes on each side
Remove from heat, sprinkle with parsley and lemon juice
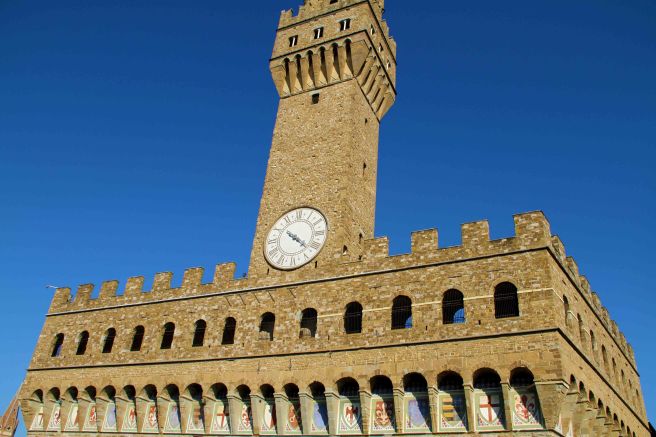
One of my favourite parts of Florence is Piazza della Signoria. It is located near the imposing Ponte Vecchio, spanning the Arno River. It is truly the ‘open air art museum’ so many travel books refer to. Walking in between the copy of Michelangelo’s David, Perseus with Medusa’s head and the Medici lions, you can’t help but feel like a culture vulture! And, if that is not enough arts for you, the Uffizi Gallery is just around the corner.
The Palazzo Vecchio on the Piazza della Signoria
Hubby and I chose the perfect day for an outing to Uffizi: windy, with thunder clouds looming in the sky. We started out all excited, admiring each piece of art we walked by. Slowly the admiration turned to awe as we marvelled at the hall upon hall, each filled with exquisite art and sculptures. But as the hours passed, the wonderment slowly started turning into a feeling of trepidation, especially when we realised that after four hours we probably did not even see half of the things on display yet. And when we finally arrived at the Uffizi rooftop café and even it was closed, desperation took over and I thought to myself that I might never make it out alive again!
Luckily we eventually managed to find our escape and headed towards the Piazza del Duomo. On the way there the clouds finally gave in and it started to pour down with rain. After our exhausting day I really started to feel sorry for myself (and my feet in particular), when hubby spotted a little trattoria. What a lovely place. The décor was so special; wagon wheels against the walls, filled with wine corks! The aroma from the kitchen made our mouths water. So with a lovely glass of Chianti in hand, we studied the menu and finally decided on a wild boar stew (have to try something new every now and again) and a bistecca Fiorentina for supper. Red wine and red meat, just the thing to comfort you after a long and tiring day! Hubby had the wild boar and it was truly delicious, with a rich tomato based sauce. The steak was waaaaaaaaaaaaaaay to much for me to finish but was really cooked to perfection. (However, not the best thing to have this meal if you still need to walk back to your hotel afterwards!)
The little haven we discovered!
Seeing that this was a particularly trying week for me, what better way to start off the weekend than with the comfort food that includes some good meat and good wine. So with that said, buon appetito!
Italian style Bistecca
(serves 2)
Ingredients:
2 T-bone steaks (about 350g each)
2 tablespoons olive oil
2 tablespoons butter
1 teaspoon chopped thyme (fresh)
Salt and pepper to taste
300 ml chicken stock
2 corn on the cob
125g polenta
200g baby spinach
1 lemon, cut into wedges
Method:
Fill a pot with water, enough so that it will cover the corn, and bring to the boil.
Once the water reaches boiling point, add the corn and boil for 10 minutes.
Remove from the water, rub with half the butter and season with salt and pepper.
Place the corn on a griddle pan and char the the corn slightly.
When done, slice off the kernels (holding the corn upright and cutting top to bottom). Set aside.
Add the chicken stock to a pot and bring to the boil.
Add the polenta to the stock by whisking it in. Cook for 25 minutes, until creamy.
Rub the steaks with the olive oil, thyme, salt and pepper.
Get your griddle pan really hot and fry for 4 minutes on each side. Remove from pan and cover the meat with some foil. Leave the meat to rest for 10 minutes.
Heat a little butter in a pan and add the spinach and corn. Just warm it through so that the spinach wilts.
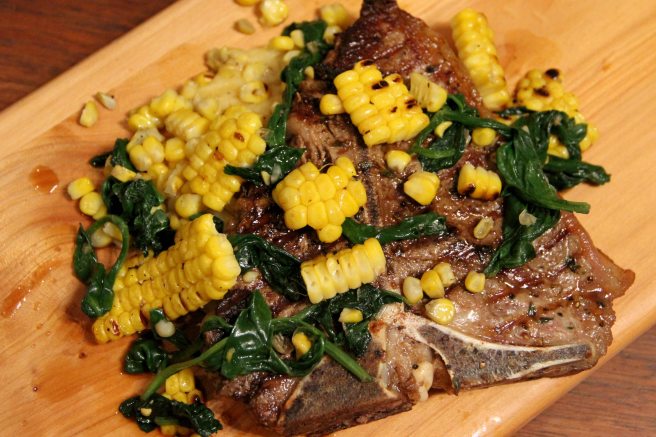
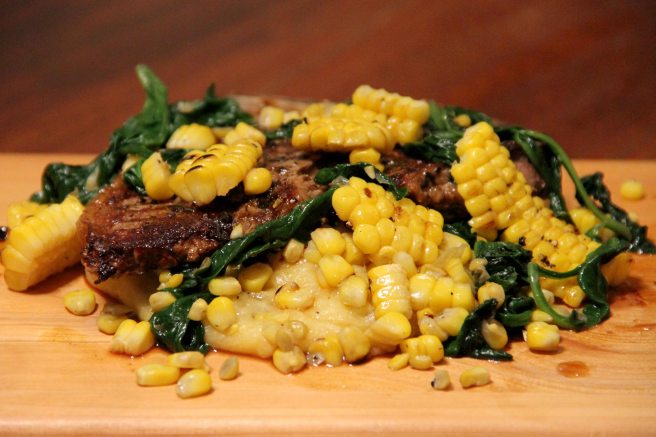
When serving, place the polenta on the plate and put the steak on top of the polenta.
Place the spinach and corn on top of the steak.
Drizzle the left-over meat juices over the steak and serve with lemon wedges on the side.
Last week I was in the fortunate position to be gifted with something a bit less sour! Firstly some eggs from my boss (at work, that is!). She has her own chickens at home, roaming around her yard, so free-range eggs are always in abundance at her house. Secondly I received a whole bunch of passion fruit from a friend who has a real enthusiasm for organic and sustainable living and has really green fingers.
Most mornings I have some eggs for breakfast; it’s quick and simple and it keeps me going throughout the day. But being gifted with these eggs I did not feel it would do them justice to just do a quick scramble. And the passion fruit really needed to be celebrated. On the day I took them home I cut one open and ate it with a spoon straight from the shell; it was delicious and sweet and the smell was intoxicating. It tasted like carefree summer days!
So what to do with these bountiful gifts? When in doubt, I always turn to my trusted recipe books and as usual they did not let me down. In Rick Stein’s French Odyssey he has this beautiful recipe for passion fruit crème brûlée with passion fruit jellies. It sounded lovely. However, I must be honest and say that I cheated a bit – the jellies were going to take too much time to make on a Sunday morning and in his recipe he rests his cream mixture overnight to really soak up the vanilla flavours. So I improvised a little bit… and I was still really pleased with the way it came out.
Here’s to the flavours of summer! (And I am still going to try those jellies sometime!)
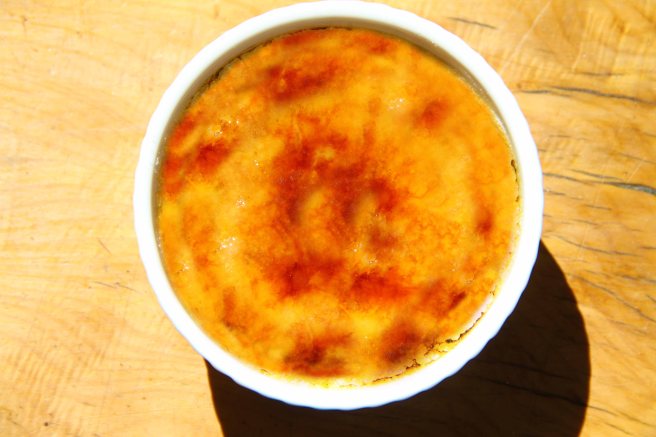
Passion fruit crème brûlée
(serves 6)
Ingredients:
1 vanilla pod
600ml double cream
8 egg yolks
100g caster sugar
200ml passion fruit puree
Method:
Pre-heat your oven to 130°
Cut the vanilla pod open lengthwise and scrape out the seeds
Place the cream in a medium pan and add the vanilla seeds and bring slowly to the boil (I put the actual pod in as well to get the maximum flavour out of it)
Once brought up to the boil, remove from the stove and leave to cool (I poured the liquid out into a separate bowl, so that it cools quicker; you can strain it at this point to make sure that no pieces of the vanilla pod is left)
Whisk the egg yolks and 50g sugar until it turns thick and pale
Slowly drizzle the cream into the egg mixture, whisking continuously (be sure that your cream mixture has cooled down enough, else you will have scrambled eggs!)
Add the passion fruit puree to the mixture and mix well through
Place 6 ramekins inside a deep roasting tray
Pour the brûlée mixture in a jug from which you can easy pour it into the ramekins, filling it right to the top (I was a bit over zealous with the mixing in point 7 and this made my mixture a bit foamy, so although I filled them to the top, during the baking process they did flatten a bit – be warned!)
Transfer the tray to the oven and then pour enough boiling water in the tray to come half way up the sides of the ramekins
Bake the brûlées for 50 minutes (they should have a slight wobble when you take them out)
Remove the ramekins from the tray and place them in the fridge to cool
Once you are ready to serve, sprinkle the remainder of the sugar evenly over the top of each brûlée
Either put them under a grill for 1 to 2 minutes until the sugar has melted and go a golden brown or you can use a blow torch (I thought this was the perfect excuse to finally get a cheffy gadget!)
Italy was nothing like I thought it would be. I thought I would really be keen on the history, the culture, the food, the wine… but I was wrong. I didn’t like it. No. Instead I fell completely and utterly in love with each and every aspect of this incredible country. From the breath-taking beauty of Venice to the magical Amalfi coast, with incredible Tuscany in between.
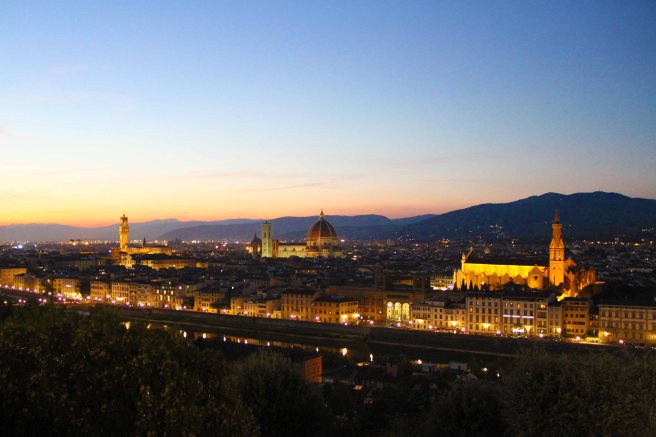
We spent our time in Tuscany using Florence as a base. It was so much more than I expected! It is a city of art, culture, great food and music. Everywhere we went we were greeted with a tune; from street performers playing as twilight fell, while we marvelled at the Tuscan hills twinkling with lights and while famous Renaissance landmarks stood silhouetted in the foreground gazing out from Piazzale Michelangelo, to being caught up in marching bands walking down the street towards the marvellous Piazza della Signoria and its line-up of sculptures. Life had a soundtrack when we were there! Florence is really a place I think I could call home. Sitting next to the beautiful Arno River, watching row boats go by, sipping aperol (without pulling a face), life felt pretty good. (OK, if you’ve been following my blog you would know aperol is not a personal favourite… but as they say – when in Rome… or Florence!)
Lovely farm
Great food, great views
On one of the days we explored the Tuscan country side, we stopped for lunch at a farm called Fattoria Poggio Alloro. It is just outside San Gimignano where you can find twelve beautifully preserved medieval towers (in its day it had seventy!). The farm produce and sell everything from olive oil, pasta, cured meats and of course, glorious wine! Hubby and I first did a cellar tour before we sat down to an amazing lunch. The setting was really what Italian dreams are made of, with spectacular views over the Tuscan country side and the towers of San Gimignano looming on the horizon.
Beautiful Tuscan landscape
San Gimignano in the background
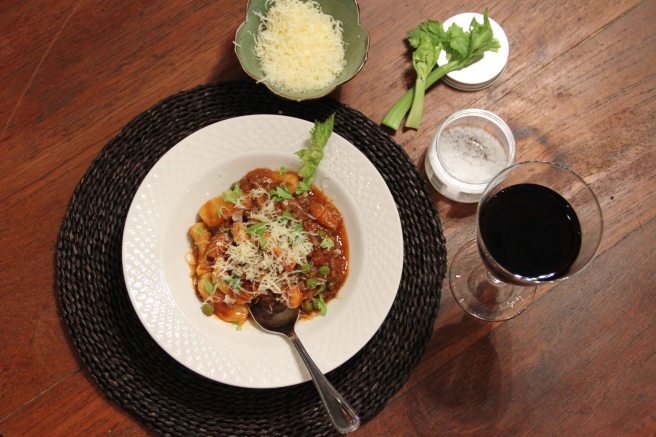
Lunch consisted of lovely fresh breads with some prosciutto, salami, olive oil and balsamic vinegar. Main course was the kind of Italian pasta you hope to have on a visit to Tuscany, served with a rich, delicious meat ragu and a side salad. And don’t forget the wines! We ended off with a sweet dessert wine. Simply put – it was a foodie’s heaven.
So tonight, while weather is cooling down here in Cape Town and light rain falls outside, hubby and I thought we would pay homage to this wonderful meal we had. Definitely a good way to start the weekend.
Lamb shank ragu with homemade cavatelli pasta
(serves 4)
First get started on your lamb ragu. While that cooks away, you can start on your homemade pasta.
We use a pressure cooker to cook the lamb shank quickly. If you don’t have a pressure cooker you should aim to cook your meat for about 2 hours to ensure it is nice and soft.
Lamb shank ragu
Ingredients:
2 tablespoons of olive oil
500g lamb shank
1 large onion, finely chopped
2 garlic cloves, crushed
4 medium carrots, peeled, and sliced diagonally
2 celery stalks, chopped
½ cup of frozen peas
Bunch of rosemary and thyme (tie it up, so you can take it out easier at the end)
1 cup of good red wine
1 tablespoon of Worcestershire sauce
1 cup of water
1 teaspoon of sugar
2 tablespoons tomato puree
400g tin of diced tomatoes
1 chicken stock cube
Salt and Pepper to taste
Method:
Heat the olive oil in a pressure cooker over medium heat. Add the lamb shank and fry until brown on all sides.
Add the onions and fry until golden brown. Add the garlic and stir for a minute longer.
Add the carrots and celery and fry for another 2 minutes until the vegetables start to soften.
Add the cup of red wine and let the alcohol cook down.
Add the tin of chopped tomatoes, tomato puree, Worcestershire sauce, and the cup of water.
Next, add the sugar, stock cube and season with salt and pepper.
Now add your bunch of herbs and close the pressure cooker.
Cook on medium heat for an hour. Now get on with your homemade pasta – see the recipe and method further down…
After an hour, remove the lamb shank from the pressure cooker. Discard the bunch of herbs.
Shred the meat off the bone – it should be soft and very tender. Discard the bone and any fatty pieces.
Reduce the sauce in the pressure cooker pot (lid off) until it has thickened.
Add the peas to the sauce and return the meat to the pot.
Simmer at low heat, while you boil your pasta
Fry lamb shank until brown and veggies until soft
Add wine and cook down
Add rest of liquids and add herbs. Cook for an hour.
Remove from pressure cooker.
Shred the meet fine.
Reduce the sauce in the pot.
Homemade cavatelli pasta
Ingredients:
500g of “00” flour
Pinch of salt
1 tablespoon olive oil
1 ¼ cups of cold water
Method:
Place the flour in a large bowl. Make a little well in the center. Add the salt, oil and water and mix with a fork until a dough is formed. (It works best to get it together in a bowl and then turn it out on your counter and work into a firm ball.)
Divide the dough into small pieces and roll it on your countertop to form a “sausage”/rope that is about 1cm thick. Start by working your hands from the inside to the outside to try and keep the shape as even as possible.
Using a knife, slice the dough into about 2 to 3 cm pieces.
Next, shape the cavatelli with your thumb. Put the piece of dough on the counter and push the dough against the countertop away from you so that the dough stretches slightly and folds around itself, creating a little pocket in the middle.
Place the cavatelli on a lightly floured baking tray (do not let them touch) and let it rest for 40 minutes.
Bring a pot of salted water to the boil. Toss the cavatelli in and cook until it floats to the top and stays there. It takes approximately 3 – 8 minutes, depending on the size of your pasta.
Transfer the pasta to a strainer and drain.
Make your cavatelli by pressing it down with your thumb on to the countertop, pushing away from you
Roll the pasta in thin “sausages”/ropes
It should be no more than 1cm thick
Lastly, add your drained pasta to the ragu and let it simmer for 10 minutes to absorb all the lovely flavours of your ragu.